When designing software, effective use of design patterns can simplify your design, save you time and produce results more quickly.
In the following posts I will be demonstrating the implementation of one the Gang of Four’s frequently used patterns, The Command Pattern.
The final result will be a web application which the user will be able to experiment with, written in C# .NET 3.5
To start, let’s look at the Wikipedia’s definition of the Command Pattern:
an object is used to represent and encapsulate all the information needed to call a method at a later time. This information includes the method name, the object that owns the method and values for the method parameters.
Three terms always associated with the command pattern are client, invoker and receiver. The client instantiates the command object and provides the information required to call the method at a later time. The invoker decides when the method should be called. The receiver is an instance of the class that contains the method’s code.
As I’ve based this project on an example in the excellent book Head First Design Patterns, I’ve included its definition of this pattern below:
Encapsulates a request as an object, thereby letting you parameterize clients with different requests, queue or log requests and support undo-able operations.
In UML this pattern is defined as:
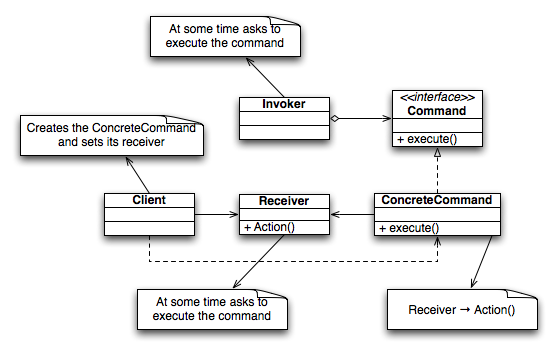
Command Design Pattern Class Diagram
Now we have a definition of the pattern, I will explain the project brief.
The idea is to code an API for a Home Automation system, operated by a hand-held remote control. The Remote Control will be able to control any household appliance through a simple interface; seven pairs of on/off buttons, plus an undo button. Each pair of on/off buttons will allow one particular command to be activated and deactivated. As the pair of on/off buttons have to correspond with the same command, I will from now on refer to them as a “command slot”. The Remote Control has seven command slots. The appliances will be likely to change in the future with new features added to them. Additionally, new appliances may be added to the house. The changes in the appliances should not cause us to change code in the remote control.
The user will be able to add and remove the command in each command slot during run time.
The undo button will undo the last action performed.
The Remote Control Object is the Invoker in this pattern. When a button on the Remote Control is pushed a command object execute() method is invoked.
The appliances are instances of the Receiver in this pattern. Calls to a receivers methods are made by instances of the command objects.
The House class is the Client in this pattern, which instantiates and holds references to both the Remote Control and the Appliance objects. There is only one Remote Control per house.
At this stage of the project the receiver classes all must have parameterless constructors, as well as an on and off method along with a publicly accessible boolean property representing the state of the object (either on or off).
By using this design pattern, the Remote Control is decoupled from the Command Objects and the Appliances. The first four classes are CeilingFan, GarageDoor, Light, and Stereo.
The Light Class is one of our Appliances and is a Receiver in this pattern. Source code for this class and the other receiver classes can be found in my Subversion repository
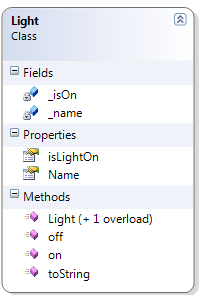
Light Class
Boolean _isOn holds the state of the Light, which is accessed through the read only Property isLightOn
The on() and off() methods when called, do what their names suggest and update the boolean field _isOn accordingly.
ICommand Object Interface (source code here)
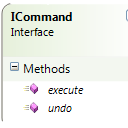
Command Object Interface
All Command Objects implement this interface, and are responsible for executing methods in the receiver classes.
execute() invokes a method or methods in the receiver class.
undo() invokes a method or methods in the receiver class that does the logical opposite of whatever the execute method does.
The LightOnCommand Class is concrete Command object. See Source Code for all Command Objects
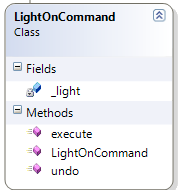
Light On Command
It’s constructor must be passed a Light object as a parameter, which is stored in the _light field.
When the execute() method is invoked, it calls the on() method of the _light object, and the undo() method when invoked calls the off() method on the _light object.
1 2 3 4 5 6 7 8 9 10 11 12 13 14 15 16 17 | public class LightOnCommand : ICommand { private Light _light; <code> public LightOnCommand(Light light) { _light = light; } public void execute() { _light.on(); } public void undo() { _light.off(); } } |
Because the Receiver object being called has only a binary state which is toggled with the on() and off() methods, this command is very straightforward. In a latter we will introduce a more advanced use of state in Receiver classes.
The LightOffCommand Class is another implementation of the ICommand interface
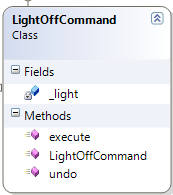
LightOffCommand
As you have probably guessed, this class is the corresponding “Off” command for the previous Command Class.
This time, execute() turns _light object off, and undo() turns the _light object on.
Another Concrete Command Class used in the application is NoCommand, which acts as a Null Object. Its execute() and undo() methods don’t do anything. Null Objects are useful because we want to keep the Remote Control class simple and loosely coupled to the Command Objects; by using NoCommand as a Null Object, the Remote Control class does not have to handle a null value. For instance, when a Command Slot has not been set to a specific Command Object, a NoCommand object can sit in the slot. This saves the Remote Control needing to check if each Command Object is null before it attempts to calls its execute() method.
RemoteControl class: Responsible for invoking commands objects (source code)
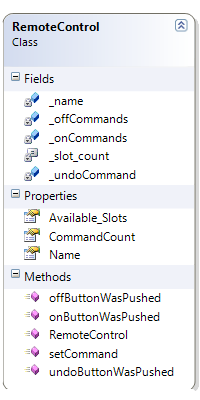
Fields: _undoCommand holds an ICommand object. _offCommands and _OnCommands can hold an array of ICommandObjects
The Remote Control is created with each command array populated with NoCommand objects, the House object uses the setCommand() method to add them.
Available_Slots and CommandCount properties are used by the House class to determine how many slots are unassigned in order to assign new commands.
When the onButtonWasPushed(int) and offButtonWasPushed(int) methods are called, they look up the command object stored in the respective _onCommands or _offCommands arrays at the index passed in as the parameter. The execute() method of the command object is called. The Remote Control does not need to know what the command does or how it works; it just needs there to be an execute method to call. It is decoupled from the Command Object.
Additionally when either onButtonWasPushed(int) or offButtonWasPushed(int) methods are invoked the _undoCommand field is set to whatever command object was executed. This field will always hold a reference to the last command object executed. When the undoButtonWasPushed() method is called it in turn calls the undo() method of that command object. This is how the global undo feature is implemented
The Command Pair struct represents a Command Slot, a pair of commands objects which turn on or off a single appliance.
Defined as:
1 2 3 4 5 6 | public struct command_pair { public string Name; public ICommand onCmd; public ICommand offCmd; } |
The House Class: Responsible for Appliances, Command Objects, and the Remote Control (Source Code)
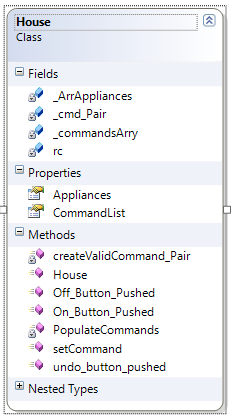
House Class
Fields:
- _ArrAppliances holds an ArrayList of the Appliances.
- _cmd_Pair is Command Pair struct
- _commandsArry holds an ArrayList of Command Pair structs, which are all the valid commands for the House object.
- rc is a reference to the Remote Control object
Properties:
- Appliances is the read only ArrayList of _ArrAppliances.
- CommandList is the read only ArrayList of _commandsArry.
The PopulateCommands() method creates the valid appliances for the house and the command objects that control them. As we want the house class to be loosely coupled with all the appliance classes and the command objects, I have written the code so these objects are created dynamically at runtime, using Reflection.
In order to do this, the Command Objects need to be defined outside of the code. I have chosen to store this information in a SQL server database, although storing the data in a XML file would be equally valid format. As I am using LINQ to SQL, the syntax does not have to change much in order to do this.
1 2 3 4 5 6 7 8 9 10 11 12 13 14 15 16 17 18 19 20 | private void PopulateCommands() { _commandsArry = new ArrayList(); RCDatabaseDataContext db = new RCDatabaseDataContext(); var query = from c in db.CommandObjects select c; foreach (var x in query) { _commandsArry.Add( createValidCommand_Pair(x.Name, x.ReceiverType, x.OnCmdName, x.OffCmdName) ); } } |
The four attributes retrieved from the LINQ query contain all the information for the createValidCommandPair() method to create a Command Pair for a single Remote Control Command Slot. Below is a row from the Command Object table.
| Command Name | Receiver Type |
ON Command Class | OFF Command Class |
| Light Command | RemoteController. ReceiverClasses.Light |
RemoteController. LightOnCommand |
RemoteController. LightOffCommand |
These parameters are then passed to the CreateCommand_Pair() method:
Using reflection, the receiver object paramType is created and then passed as a parameter to both the ICmdOnObj ICmdOffObj constructors.
The object paramType is then stored in the _Appliances ArrayList.
Both Command Objects are set as Properties in the slot command_pair, which is then returned to the PopulateCommands() method.
1 2 3 4 5 6 7 8 9 10 11 12 13 14 15 16 17 18 19 20 21 22 23 24 25 26 27 28 29 30 31 32 33 34 35 36 37 38 39 40 41 42 43 44 45 46 47 48 49 50 51 52 53 54 55 56 | private command_pair createValidCommand_Pair (string CmdName, string strparamType, string strOnCommandType, string strOffCommandType) { command_pair slot; Type TypeOnCmd = Type.GetType(strOnCommandType); Type TypeOffCmd = Type.GetType(strOffCommandType); Type paramType = Type.GetType(strparamType); //creating the Receiver Object object paramObj =Â Activator.CreateInstance(paramType); //creating the ON command object System.Reflection.ConstructorInfo[] ciOnCmd = TypeOnCmd.GetConstructors(); //create the OFF command object System.Reflection.ConstructorInfo[] ciOffCmd = TypeOffCmd.GetConstructors(); object[] objarr = new object[1]; //store created Receiver object in appliances arraylist _ArrAppliances.Add(paramObj); objarr[0] = paramObj; //create the on and off command objects //with the same receiver object ICommand ICmdOnObj = (ICommand)ciOnCmd[0].Invoke(objarr); ICommand ICmdOffObj = (ICommand)ciOffCmd[0].Invoke(objarr); //set command_pair struct values slot.Name = CmdName; slot.onCmd = ICmdOnObj; slot.offCmd = ICmdOffObj; return slot; } |
The PopulateCommands() method then adds each of the new command_pair structs to the _commandsArry ArrayList.
This design for the Appliances and Command Classes are decoupled from the Remote Control class. Commands Pairs are defined in a database, which means they can be altered at runtime. For instance, if one needed to create a new Command Pair for a new appliance, one would just need to add its definition to the Command Objects table.
T-SQL script to create the Command Objects table can be found here in my Subversion repository, along with the script which populates that table with data to create the Command Pairs. In order to use LINQ to SQL the user will have to a new DBML file to the solution, with named “RCDatabase.dbml”, and add the CommandObject table to file. The details of the database schema and how LINQ to SQL is used in this project will be covered in a later post.
Now that we have the classes required for our Home Automation Program I will demonstrate how we can test that they work correctly, and stay that way as we update the code. In my next post I will show how this is done using Test Driven Development with NUnit, along with a working demo of the code