Archive for category DevOps
Solving problems of scale using Kafka
Posted by Michael Okarimia in 7digital, API, Automation, Cloud, DevOps on March 1, 2016
At 7digital I was in a team which was tasked with solving a problem created by taking on a large client capable of pushing the 7digital API to its limits.  The client had many users and expected their numbers to exponentially increase. Whilst 7digital’s streaming infrastructure could scale very well, the requirement was that client wanted to send back the logs of the streams back to 7digital via the API. This log data would be proportional to the number of users. 7digital had no facility for logging said data being sent from a client, so this would be a new problem to solve.
We needed to build an Web API which exposed an endpoint for a 7digital client to send large amounts of JSON formatted data, and to generate periodic reports based on such data. The expected volume of data was thought to be much higher than what the infrastructure in the London data centre was capable of supporting. It was very slow, costly and difficult to scale up the London data centre to meet the traffic requirements. It was deemed that building the API in AWS and transporting the data back to the data centre asynchronously would be the best approach.
Kafka was to be used to decouple the AWS hosted web service accepting incoming data from the London database storing it. Kafka was used as a message bus to transfer the data from an AWS region back to the London data centre. It was already operational with the 7digital platform at this time for non real time reporting purposes.
Since there was no need to use the London data centre, there was no advantage in writing another application in C# that could be hosted on the existing Windows webservers running IIS. Given the much faster boot times of Linux EC2 instances and the greater ease of using Docker in Linux, we elected to write the web application in Python. We could use Docker to speed up development.
The application used the Flask web framework. This was deployed in an AWS ECS cluster, along with a nGinx container to proxy requests to the python API container and an DataDog container which was used for monitoring the application
The API was very simple, once the inbound POST request was validated, the application would write the JSON to a topic on a kafka cluster. This topic was later consumed and written into a relational database so reports could be generated from it. The decoupling of the POST requests from the process that that writes to the database meant we could avoid locking the database, by consuming the data from the topic at a rate that was sustainable for the database.
Since reports were only generated once a day, covering the data received during the previous day, there could be a backlog of data on the kafka topic; there was no requirement for Near Real time Data.
In line with the usual techniques of software development at 7digital, we used tests to drive the design of this feature and were able to achieve continuous delivery. By creating the build pipeline early on, we could build the product in small increments and deploy them frequently.
We had the ability to run a makefile on a developer machine which built a docker container running the Python web app. We could then use the Python test frame unittest to run unit, integration and smoke tests for our application. Â The integration tests were testing if the app could write to Kafka topics and the smoke tests were end to end tests, which ran after a deploy to UAT or Production to verify a successful deployment.
We successfully completed the project and the web application worked very well with the inbound traffic from the client. Since it was hosted in an EC2 cluster we could scale up both the number and the resources of the instances running our application. The database was able to cope with the import of the voluminous user data too. It served as a good example of how to develop an scalable web API which communicated with a database located in a datacentre. It was 7digital’s first application capable of doing so and remains in use today.
Fixing 7digital’s Music Search, Part Two: The 88% Speed Improvement
Posted by Michael Okarimia in 7digital, API, Automation, CFEngine, DevOps, search, SOLR, Vagrant, Virtualization on August 18, 2014
I’m Michael Okarimia, and I’m Team Lead Developer of the Content Discovery Team at 7digital, starting from Jan 2014. The Content Discovery team recently improved the catalogue & search infrastructure for the 7digital API. This post is the second in a series which explains how we turned resolved many of the long standing problems with 7digital’s music search and catalogue platform. If you haven’t read the first post in the series, which explains the problem of making 27 million tracks searchable, go and start reading from there.
In this post I detail how we improved the track search service so it’s response times reduced by 88%.
How we fixed track search: From 2014 onwards
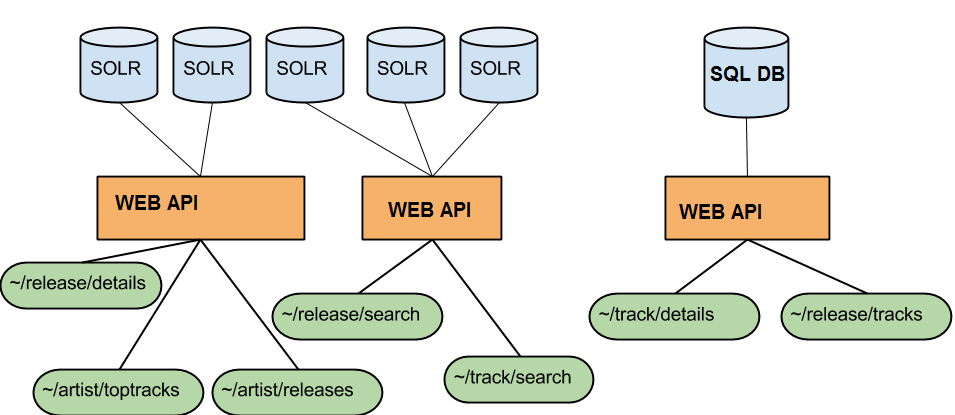
As discussed in the previous post in this series, the data store used for searching tracks was a Lucene index being used as a document store, totalling 660gb in size. It was clearly far too large, and a scalable alternative had to be found. We also had to solve the inconsistency problems what arose due to the search index never being as up to data as the SQL database used to power the rest of the platform. These problems manifested themselves to API users as sporadic internal server errors when ever they wanted to stream or purchase a track that was returned from a search result.

Search and Catalogue API endpoints with their different databases. This caused inconsistencies, but it increases availability
Rather than using Lucene as both a document store and a search index, we decided to create a new search index based on the searchable fields only, and use it to resolve 7digital track IDs. Armed with the track IDs that matched the search terms, we could do a look up on the catalogue database and then return that as the result. At the time we thought this should fix the inconsistency problem, and perhaps make searching faster.
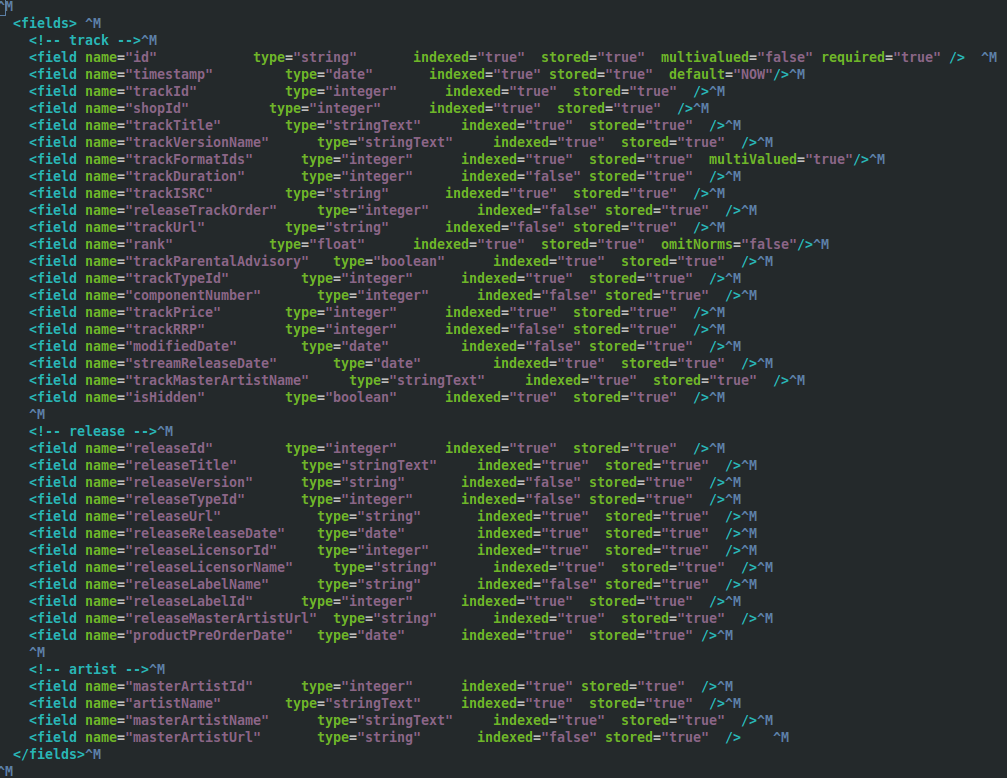
Given that we were all relatively new to the team, we did some through investigation of the the search platform. We discovered that the previous schema in production was indexing fields like track price which were never actually searched upon. Additionally all of the twenty nine fields were stored, which was needed because it was used as document store. This increased the size of the index.
We created a prototype and came up with a much smaller search index, around 10 Gb in size compared with 660Gb. This new index contained only the searchable fields, such as track title, artist name and release title, reducing the schema down from twenty nine indexed fields to just nine.
When querying the new smaller index, the response would only contain the track IDs. However the response from the track search API endpoint is more than a list of track IDs. It is enriched with ample track metadata that can be used to build results in a search results page. There had to be a second step to fetch this data.
The returned IDs would then be used to look up the details of the track (such as it’s title, price and release date), and then the track details were composed into a single, ordered list of search results. The meant that the modified track/search endpoint would then return that list, which looked exactly like the old track/search responses that were returned from the giant index.
There was already an API endpoint that returned the contents of a track, namely, the ~/track/details endpoint. When given a 7digital track ID it returns all the available track meta data, such as track title, artist name, release date, etc. It’s response lacked some of the fields we require that were returned in the track search responses, so we added them so it now returns the price and available formats of a track.
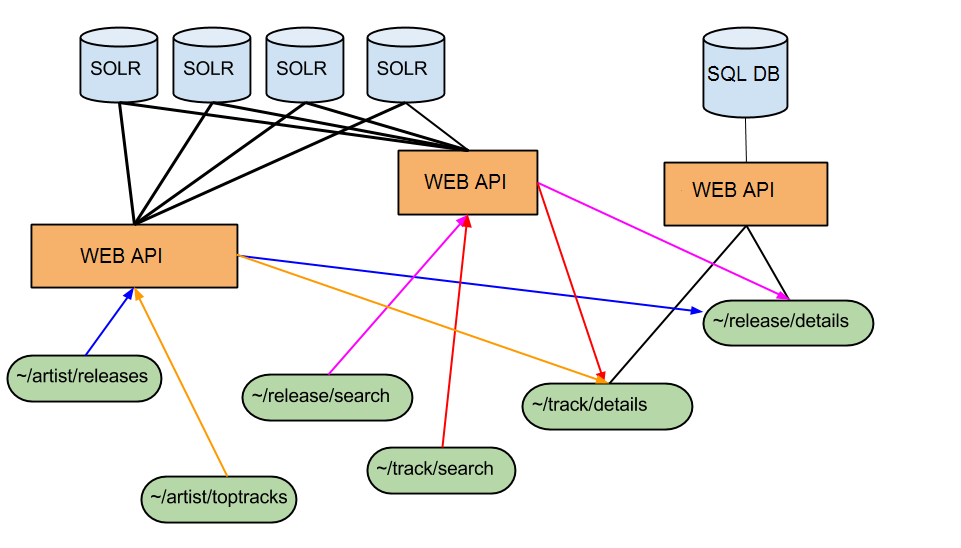
We built this second index and deployed it to production in parallel with the gargantuan 660Gb one. One by one we rewrote the search & catalogue API endpoints so they instead used the smaller index to fetch matching track IDs and then called the ~/track/details endpoint to populate the results.

Catalogue and Search Endpoints as of July 2014. All responses are populated from the SQL DB which is most up to date. There are no longer inconsistencies
To test that the schema changes worked we learned that the best way was to use Vagrant and Test kitchen prior to pushing the schema to our continuous integration platform. We used CFEngine configuration management tool to define our SOLR schemas with the configuration file edited locally on a developer’s machine. Next we spun up a Vagrant instance that would apply the configuration defined in the file, and would then run Server Spec tests to verify some of the basic functionality of the SOLR server, using the altered schema. This arrangement was informed by our prior work to test infrastructure code, which I previously blogged about. Once the initial schema changes were known work on SOLR, we pushed the new schema up onto our continuous integration platform, something which Chris O’Dell has blogged about more eloquently than I could. Part our deployment pipeline then ran acceptance tests against the API endpoints which use this index, verifying that existing functionality was intact.
Using this technique, we migrated our APIs that relied upon this gargantuan 660Gb index to use the new smaller one instead. At the time of writing it is 100 times smaller, weighing in at 6.3 Gb.
The new smaller search index came with a number of advantages;
- being reliant on the ~/track/details endpoint meant we always returned current results, and we were 100% consistent with the rest of the API, which eliminated the catalogue inconsistencies problem;
- we could create a brand new index within an hour, meaning up to date data;
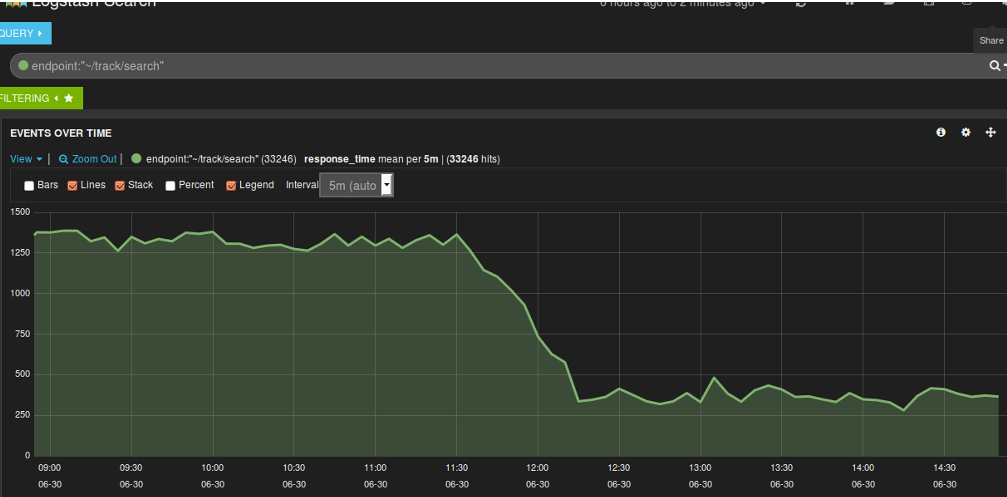
- much faster average response times for ~/track/search, reduced the response time by 88% from around 2600ms to around 350ms;
- no more deleted documents bloating the index, thus reducing the search space;
- longer document cache and filter cache durations, which would only be purge at the next full index every 12 hours, this helped performance;
- quicker to reflect catalogue updates, as the track details were served from the SQL database which could be updated very rapidly.

Y Axis units in milliseconds. Once we used a smaller index and enabled filter caching, the response time dropped.
Now that the entire index could fit in the memory of the server hosting it, this gave advantages such as:
- faster document retrieval;
- no more long JVM running garbage collection processes causing performance issues and server connection time outs. These were triggered replication when the index was changed, this now only occurred twice a day when the index was rebuilt;
- The platform could now cope with more traffic, based our our load tests using JMeter
Searching for Music Releases
We have also started this strategy for our release search endpoint. This endpoint performs searches for on the metadata of a music release based on the search terms. For example, one can search for either an artist or a release title. This endpoint queries a Lucene index containing data about music releases which is used as a massive document store as well as a search index. There are around 2.7 million releases in 7digital’s catalogue that are searchable.
We have integrated a call to the ~/release/details endpoint for each release ID returned in the results of a query to the ~/release/search index. This makes the endpoint always consistent with the catalogue DB, which fixed the inconsistency problem we had when searching for releases. At the time of writing we haven’t yet built a smaller release index which would improve response time, but this work is already under way.
We aim to reduce the size of the release index too and be able to build a new one multiple times a day.
For our track index, creating a new index of the music catalogue on a regular basis meant we could take advantage of the index time features that SOLR offers. I’ll write about how we used those features in a future post.
What we learnt
Never* Avoid, if possible incrementally add or delete documents to or from a Lucene index without rebuilding it regularly. Otherwise you will have an index filled with unsearchable but deleted documents which will bloat the index. This means you will inexorably experience search query times slowing over time;Never* Avoid using Lucene as a document database, it won’t scale to work effectively with millions of richly annotated documents;- Make sure your index can fit in the memory of the server it’s hosted on;
- Index as few Lucene fields as possible;
- Store as few Lucene fields as possible;
- Replication will invalidate your SOLR caches, and will trigger long running JVM garbage collections, try to minimise how often it happens;
- If you are using a Master/Slave SOLR configuration, slaves with differing replication polling intervals will lead to inconsistent responses when you eventually query the oldest non-replicated slave;
- Storing your index on Solid State Drives will speed up query time;
- Regularly rebuild your index to keep it small;
If you’re in interested in some more context of how we decided upon the implementation, my colleague Dan Watts has an excellent write up on his blog, detailing some of the problems that I mention in this post.
*Updated my opinion on how to Lucene upon reflection of Nick Tune’s comments.
Using TDD to write Infrastructure Configuration Code for Legacy Servers
Posted by Michael Okarimia in 7digital, Automation, Cloud, DevOps, Ruby on April 21, 2014
There’s much talk about DevOps these days, with its differing interpretations. One aspect is to automate the configuration of your server infrastructure, by writing configuration code that is version controlled and tested. But how can this be applied to existing infrastructure, in particular, poorly maintained legacy systems that are already in production? This challenge was one that the Content Discovery Team at 7digital (which I lead), overcame.
The Challenge
We had inherited a legacy production server with no UAT version and no tests. Every day the system generated mission critical files which were populated from a database running queries that took around eight hours to complete.
There was a requirement to change the application, but doing so immediately would mean a perilous deploys to production without any tests, which I decided was not acceptable. We were only to deploy to production, once we had built a UAT environment and tested the code there, but first step was to get the code running on a developer machine.
Our first challenge was understand what exactly the program was doing. This was made more tricky since it ran out of date versions of ruby, on old versions of Linux.
After some frustrating period attempting to run the current code with it’s ancient ruby gems, we decided that “what the software did” trumped the “how it did it”. A new production server with the latest versions on ruby and gems would ultimately be created, with a matching UAT environment.
Replacing manual configuration with automated configuration
7digital have been moving to single configuration management system and CFEngine was the tool of choice. Rather than manually installing and configuring the new server, we wrote a CFEngine promise file with the bare minimum requirements for the new application, starting with the requirement that the correct version of ruby was installed.
As a team (myself, Dan Kalotay, Dan Watts & Matt Bailey) we were familiar with CFEngine, but not with testing configuration code. We were helped by fellow 7digital developers Sam Crang and James Lewis, who got us up and running with Test Kitchen, and Anna Kennedy whose CFEngine knowledge helped us greatly.
To test the configuration we used Test Kitchen. It uses Vagrant to spin up a new Debian server on the development machine. The Debian image was one of our production server images which had CFEngine agent pre-installed. Using the Vagrant file we slaved it to use the locally edited CFEngine file as its source of configuration, instead of a remote CFEngine hub. Once the virtual machine had been created it would call the Test Kitchen kitchen converge command, which would apply the CFEngine promises defined in the local promise file.
So far, so DevOps. But how does one automatically assert if the promises set the desired state?
Writing Infrastructure Code in a TDD Manner
Using Test Kitchen it is possible to run a suite of tests against the newly created virtual machine. We used Serverspec as it allows us to write Rspec style tests. Serverspec uses SSH to connect to the virtual machine and then it can run any command to assert that it was configured as desired.
We then started to write tests for the state of the server in a TDD fashion. We would for example:
- Write a test to assert that a cron job will run at a certain time,
- Run the test and see it fail, since the cron job has not been created yet
- Create a CF-Engine promise to create the cron job,
- Run kitchen converge && kitchen verify to apply the configuration and run the test again
- See the test pass, or if they fail, go back to step 3
In this way we added more configuration, by repeating this Red-Green-Refactor process, which is familiar to most modern programmers. Running the Serverspec tests allowed us to drive out configuration; accreting functionality of the virtual machine and building up the configuration file that set up the server state.
Deploying to UAT
Once we were happy with the configuration, we committed and pushed the CFEngine promise file up to the CFEngine Policy hub for our UAT environment. It then was straightforward to request that our infrastructure team create the new UAT server slaved to thay same policy hub. Once in UAT we could run more detailed tests overnight, since the SQL queries we were running took around eight hours to complete. Our QA team worked with us to assert that the product worked in accordance with our acceptance criteria.
Deploying to production, now a low-ceremony, low risk event
Once every party was happy with the end result, it was time for our infrastructure team to spin up a new production virtual machine slaved to our CFEngine hub. Within minutes our replacement server was in production, along with the changes our clients required. Within a few days the old server had been permanently retired.
This was consistent with the idea that organisations should treat their servers as cattle, not pets. In the event of a server failure, spinning up a new virtual machine with little human intervention which works well in cases where the server does not store mission critical data. We had replaced a delicate and temperamental “pet-like” server and replaced it with a more disposable “cattle-like” one. In case of server problems, prod.server0001 which could be replaced within minutes with an identically configured prod.server0002.
What we learnt along the way
An early test failure we experienced was around installing ruby gems. We attempted to use CFEngine to run a shell command gem install <gemname> but this always failed. It turned out to be simpler to create it as a deb package and install it, rather than using CFEngine to execute certain shell commands to install gems. This was due to the way CFEngine executes shell commands; the permissions were not appropriate for the application user.
Another problem we overcame was how the cp command on CFEngine not synonymous with Linux cp command.
Conclusion
Whatever your particular interpretation of what DevOps means, in this project I learnt that what allowed us to succeed was close collaboration between developers and infrastructure engineers. The developers learnt much about the infrastructure and infrastructure team members became proficient in understanding how the developer application worked and comfortable with using version control for infrastructure code. Clear communication was key and we all learnt how to get the job done.
We also learnt that sometimes it’s worth starting from scratch rather than attempting to retrofit CFEngine promises to an existing server. The retrofit idea was abandoned due to it being almost as risky as editing configuration files manually on the production server.
In future I’ll always try to get all existing production infrastructure I’m responsible for configured this way, as well as using it for new infrastructure.

